|
We have a class trip to the International Ceramics Centre at Kecskemet in Hungary for two weeks starting 27th March -Covid 19 permitting. Deposits paid, excitement building, ordering bubble wrap to protect work we are shipping out to fire... The centre has a wood firing and soda kiln as well as the standard gas and electric. None of us are very familiar with using these so we are taking stoneware bisque fired pots to glaze there and test out the Hungarian glazes and kilns before we make and fire more pieces there. Dave and Rob made some press moulds for table ware so we could all quickly produce some plates and bowls to take.  I have also thrown some bowls and planters, first time on the wheel for a year. I am reasonably pleased, but had originally intended to make a lidded serving bowl for my daughter and family. Maybe later. These are all extremely plain. I was thinking functional ware but also wanted to provide a blank canvas for glaze testing. Dave (informed by a lifetime of experience) then made a very grogged clay by mixing standard stoneware, a little terracotta (to warm the tone) and gritty feldspar for press moulding. He used it himself to throw a series of beakers but I understand his hands were bleeding afterwards. He explained this clay should react well with the glaze in the wood firing to produce great effects. Well maybe its good that I have done something plain for contrast!
Dave also suggested I take some of 'reject' handbuilt forms. Well I have plenty in craft crank which might be interesting to fire as I have not yet fired them all at home. Only downside is that they weigh up to 2Kg each. What do I leave out of my luggage?
0 Comments
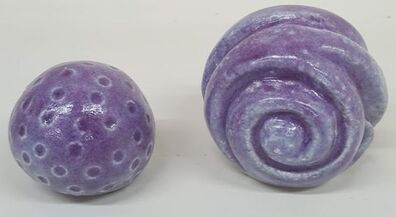
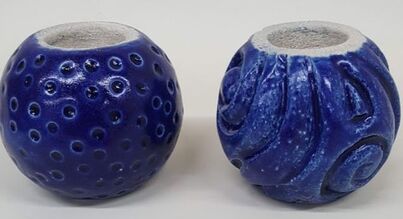
The 'pinholing' in my glazes on the carved pieces is a concern. Pinholing is usually seen as glaze problem. Harry Fraser (in Ceramic Faults and Their Remedies 2nd edition 2005 published by A&C Black) details both ceramic body and glaze problems that cause pinholing. They range from poor clay preparation, contaminants on or in the body through to constituents in the glaze (including glaze thickener) glaze application and firing technique. Fortunately I do not have to consider every single one of these possibilities. These two pairs were made of the same clay, bisque fired to the same temperature and glazed at the same time with exactly the same glaze, brushed on with the same brush.
Pinholing does not appear to happen on the 'dotted' spheres, only the carved ones. The glaze seems a little thinner on the carved pieces but enough to cause the problem? During brush glaze application is was often had to get the glaze into the dots and this may have resulted in more layers going on each area. On the other hand I had to take care to get the glaze into all the carved channels which would have had a similar effect. The glaze seemed to leave small gaps on the carved forms . Was this due to the surface? The dotted ones have been burnished prior to impressing. The carved ones, by the action of dragging a tool across and through the surface, had linear scratch marks and holes where the grog had been lifted out. 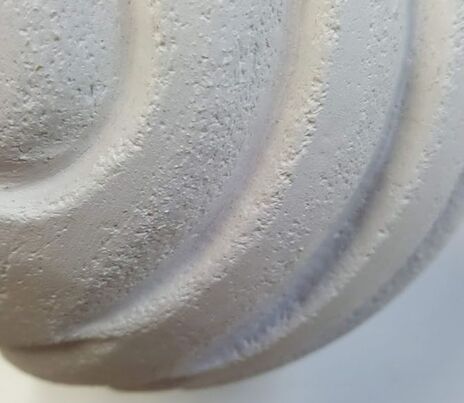 Reviewing earlier spheres, where I had 'smoothed' with a wet sponge (creating slip on the surface), there were no micro holes - but instead a more gritty surface as some of the slip had been removed leaving the grog standing proud. Glaze however mostly smoothed them over, even on craft crank as on this example. 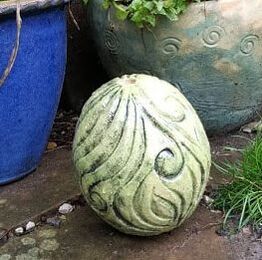 this piece did have a very thin layer of copper carbonate slip brushed over and re-bisqued prior to glazing with yellow. What are the possible remedies? Comments and concerns
I could 1.coat with slip and refire. adding slip at this stage can be a problem, though used successfully by Annie Peaker. 2.spray the piece or even dip it water to make it less absorbent prior to glazing. Tried this, did not work. 3.try burnishing the surface at leather hard. Time consuming and difficult to do all over 4.damp wipe at leather hard, taking care not to lift the grog. May not be enough unless really wet 5.wet wipe as before on dry greenware then slowly dry. Concerns expressed that doing this previously contributed to cracks 6.put a thicker layer of glaze on the carved forms. Does not appear to help the pinholing 7.trying a very thin base layer of glaze before main glazing hoping to fill the holes. This helps but does not eliminate the problem and may need a combination - perhaps 4 then 3 and 7. Testing is required. am I a glaze addict? or just never satisfied? Well, whatever, I did another 10 tests using the same base glaze ('UcA4') in order to refine some colours, and try some new. 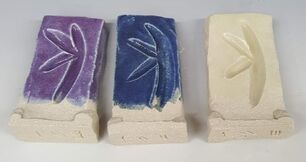 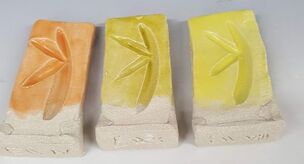 I am fairly happy with these and now have a good range from which to select my final 'palette' of glazes, though would like a slightly lighter grey and to explore refining the yellow /cream colours a little more, using more oxide less stain.  I also rechecked my UcA4 glaze on two small scale pieces each:   These glazes were all brushed on. They were fired in the same kiln at the same time, made from the same grogged ES40 clay.
The difference is that the carved forms have been smoothed off using a green washing up scrubber, the dotted ones burnished with a rib then impressed with the end of a tool. I had noticed, when brushing the glaze on, that it was difficult both to get the glaze into the dotted holes and into the little microholes on the carved forms. I hoped that if I put more glaze on the little pinholes would 'heal over' in the firing so I went ahead and glazed more before going on holiday. As seen the carved ones are covered with multiple pinholes, not what I wanted. I will need to think about this. |
AuthorI am indulging my passion for ceramics by undertaking studies for an MA at UCLAN Archives
August 2021
|
 RSS Feed
