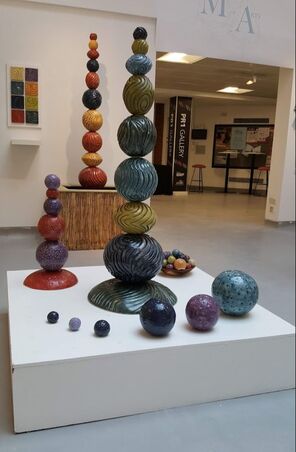
 Well not quite..... this picture shows it prior to my repainting the plinth, and before the Health and Safety Expert pointed out that the basket of toppers, though attractive, could act like a set of ball bearings if they got knocked onto the floor. The final version of my main display has a lot of white tack to prevent this. Huge thanks to the UCLan team: Rob, Cath, Dave and Geoff; to my previous teachers especially Annie, Gordon, James and Rebecca. Also to all my fellow students Mary, Patricia, Steph, Johanna, Rachelle, Kate, Janne; to my friends and family and all the others who encouraged me on the way. Biggest thanks of all go to my husband Simon for his help and support and who hopes to see me at home more! Of course its not quite over. I have an assessment on Wednesday and moderation by the external examiner on Thursday. They will also look at my supporting information What would I do differently? This is a short list of my recent reflections.  Put buttresses in the bases. the bases have a support ring built in, as shown, in the area where most of the weight of the totem rests. I have used this ring to create a further concrete infill to add stability to the central pole. This ring has been sufficient to prevent the piece splaying out and cracking through as my earlier ones did. It has not been sufficient to prevent small cracks on the underside of the piece on glaze firing, which for the blue dotted base went all the way through. Buttresses from the central ring to the edge should prevent both these crack and the slight warping that occurs. Further develop glaze recipes -as in my previous blog entry. Dont use same base glaze for all colours -as detailed in my previous blog What will I do now? Learn to use Instagram and get professional. I now have a stock of pieces and an ambition to make more. I need to publicise, decide on prices and sell. I dont use Facebook to post but have registered with Instagram and should explore Etsy. I maybe need to talk to garden designers and independent garden centres. I will use the tile board (thank you Rob!) to show colours both on line and in person.
Consider monochrome assemblies especially in cream/stone colour because some people like neutrals and my test totem, shown on my poster and virtual show, has attracted some positive feedback.
0 Comments
I had hoped that UcA6 would be my final base glaze but there are a number of minor problems with it. Firing Temperature. Ideally I would prefer to fire them all at cone 7 or even 6. The clay is still well within maturation range. Ashraf Hanna fires between 900 and 1280 deg C and James Oughtibridge only takes his large outdoor pieces to 1100. Lower temperatures are better for the environment, kinder to heating elements ( I am thinking about my own kiln here!) and give a slightly lower risk of cracks, though most of those are at the bisque stage. In addition some colours (8red, 22yellow, 11b purple, still look slightly under fired at cone 8 despite adding lithium, whilst 3(teal) needs only cone 7. Rather than fire them at different temperatures I think I need to abandon the idea of using the same base glaze for all. A small change in recipe (UcA7), back towards version 5, with a little more whiting and 1% less china clay has reduced the firing temperature for the yellow glaze; now I will adjust the others as I make more. Colour. 9(Chartreuse) has had a tendency to look a bit thin and brown so I added more yellow stain. Interestingly this does not seem to have affected the firing temperature. 22 (High temp yellow from CTM) has looked really custard like on pieces. As I had to make a new batch I replaced the stain with 'sunshine yellow' from Northern Kilns, reassured by the label stating it fired to 1280. 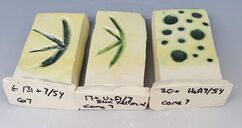 Tin and other oxide content remained the same but I also added 1% bentonite as explained below. these are fired to cone7, 1250 degC Settling All of the glazes settle a bit, but some, especially yellow, purple and chartreuse do it really badly. When discussing a different base glaze, Dave had previously recommended using bentonite 5%, but I found that glaze clumped even as it passed through the sieve. This time I looked it up, and cautiously replaced 1% of china clay with 1% bentonite.
A new pot of purple is required so I have made a further adjustment and used 2%. The test tiles are in the kiln.... I suspect my adjustments to glaze will continue. Its a good job I made plenty of test tiles! 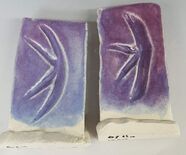 Making so many forms has used a lot of glaze, so a need to make some more. I adjusted my purple glaze to contain a slightly larger proportion of cobalt and the test tiles (11 and 11a) looked fine, so I made a pot.  I really dont know what I did with this one (6/11a), though it must have been a weighing mistake. It was fired at the top of the trolley kiln at cone 7. It is clearly very underfired, so went in again. The cone 8 was well over (so a little above temperature) but the surface, though interesting, is still a little too matt. It is shown below. It was not my only glazing problem. 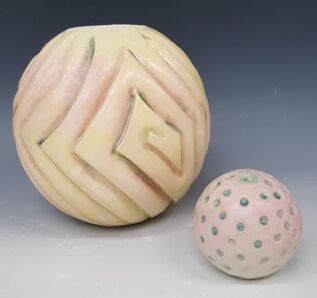 I had tested the tin containing glazes over those rebisqued with a chrome containing one and had thought that the combination did not create a risk of chrome tin pink. How wrong I was. 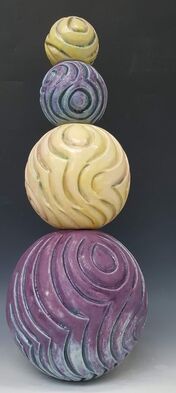 refired again at cone 8 the purple glaze (11a) is attractive if still a little matt. The yellow blushed with pink looks good with it -though this is not a combination I will be attempting to reproduce! Unfortunately these are not really in keeping with my colour range so I will have to try again with purple. 11b is on its way..... I am still having problems with crawling. This is despite using a fine slip at greenware stage, scrubbing each piece with soapy water prior to glazing then applying a thin layer of glaze followed by two or three thick layers. In deeper grooves or dots the glaze can trap a bubble which is difficult to shift; using thinner glaze initially definitely helps with this but it sometimes requires some mechanical disruption. Unfortunately this does not explain crawling on flat(ish) surfaces. 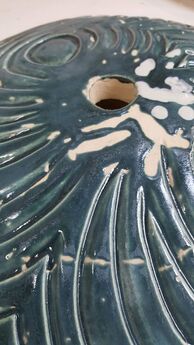 This is an extreme example with the glaze most prone to crawling (teal), applied to a large convex base plate. The piece was fired at cone 7. The glaze has pulled away from a surface crack even where the application is thinner but there are no cracks or gaps at the centre of the large bare areas at the apex. It has been possible to rescue some of these pieces by heating up and then adding a thick dab of glaze in the gaps. The white areas on the picture show the beginning of this process. 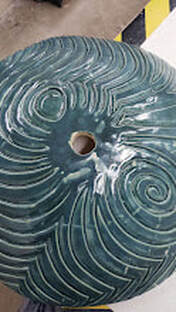 I have been please to see that the surface cracks did not open up more and have been at least partially covered. Re-firing does add extra 'heat work' to the glaze which becomes glossier and more translucent. I have tried various ways of brushing the glaze on to reduce the incidence of crawling. Physically attacking any hint of bubbles seems to help. Thinner glaze applications also do. Some times the glaze appears to 'bubble' as it goes on, though the liquid in the pot seems smooth. Is it the brush? I have not tried changing it but that would not explain why test tiles have been largely free of the problem and the largest pieces most prone. It must be my application. Retouching with a thick dab of the same glaze is not quite straightforward. Some of the glazes have been settling really quickly, so more oxide or stain is at the bottom of the pot. There is then a risk that the repaired area is a different colour. Glaze settling is a problem which is time consuming and risks uneven colour even during glazing of a single piece. I needed to try changing the base glaze. Following advice, I had previously tried adding 5% bentonite and found that the glaze clumped as is went through the sieve. I needed to look again
|
AuthorI am indulging my passion for ceramics by undertaking studies for an MA at UCLAN Archives
August 2021
|
 RSS Feed
